Steel grades overview
Cold-rolled into a premium product!
Our steel grades in detail
Quenched and tempered steels acc. to DIN EN 10132
| Standard | DIN EN 10132 | ||
| Grades | Tempering steels: C22E - C60E, 25CrMo4 - 50CrMo4 Boron-alloyed steels: 27MnCrB5-2 and similar Spring steels: C55S - C100S, 75Cr1 - 95Cr1, 51CrV4 - 80CrV2, 68CrNiMo33, 75Ni8, 102Cr6 |
||
| Chemical cast analysis | Based on DIN EN 10132 and also special analysis | ||
| Strip thicknesses [mm] (1) | Martensite: 0.30 - 5.10 | ||
| Strip widths [mm] (2) (3) | Martensite: 35 - 720 | ||
| Delivery conditions | QT - martensitic quenched and tempered | ||
| Mechanical properties (1) Hardness range |
Martensite: | Spring steels Tempering steels Boron-alloyed steels |
Hardness 30 - 54 HRC Hardness 30 - 48 HRC Hardness 30 - 44 HRC |
| Surfaces (appearance + finish) | Bright, grey-blue, polished and yellow tempered, brush-polished | ||
| Edge conditions | GK - slit edges, SK - special edges (machined or edge-rolled) | ||
| Dimensional tolerances | General tolerances: Strip width tolerances: |
acc. to DIN EN 10140 and special agreement acc. to special agreement only |
|
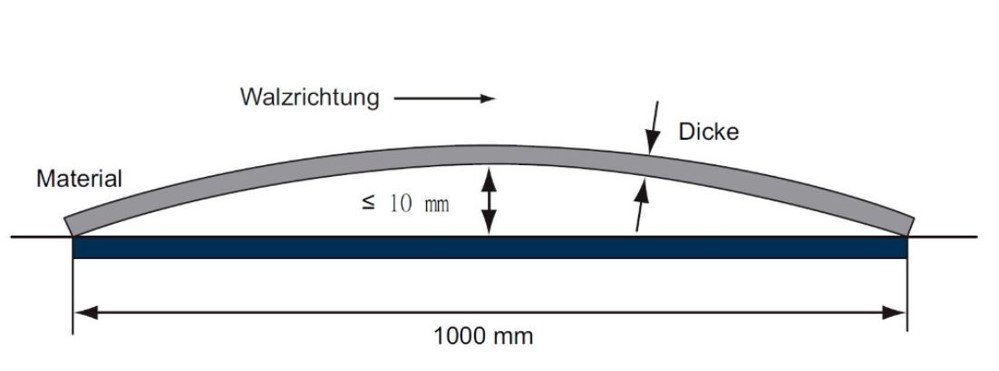
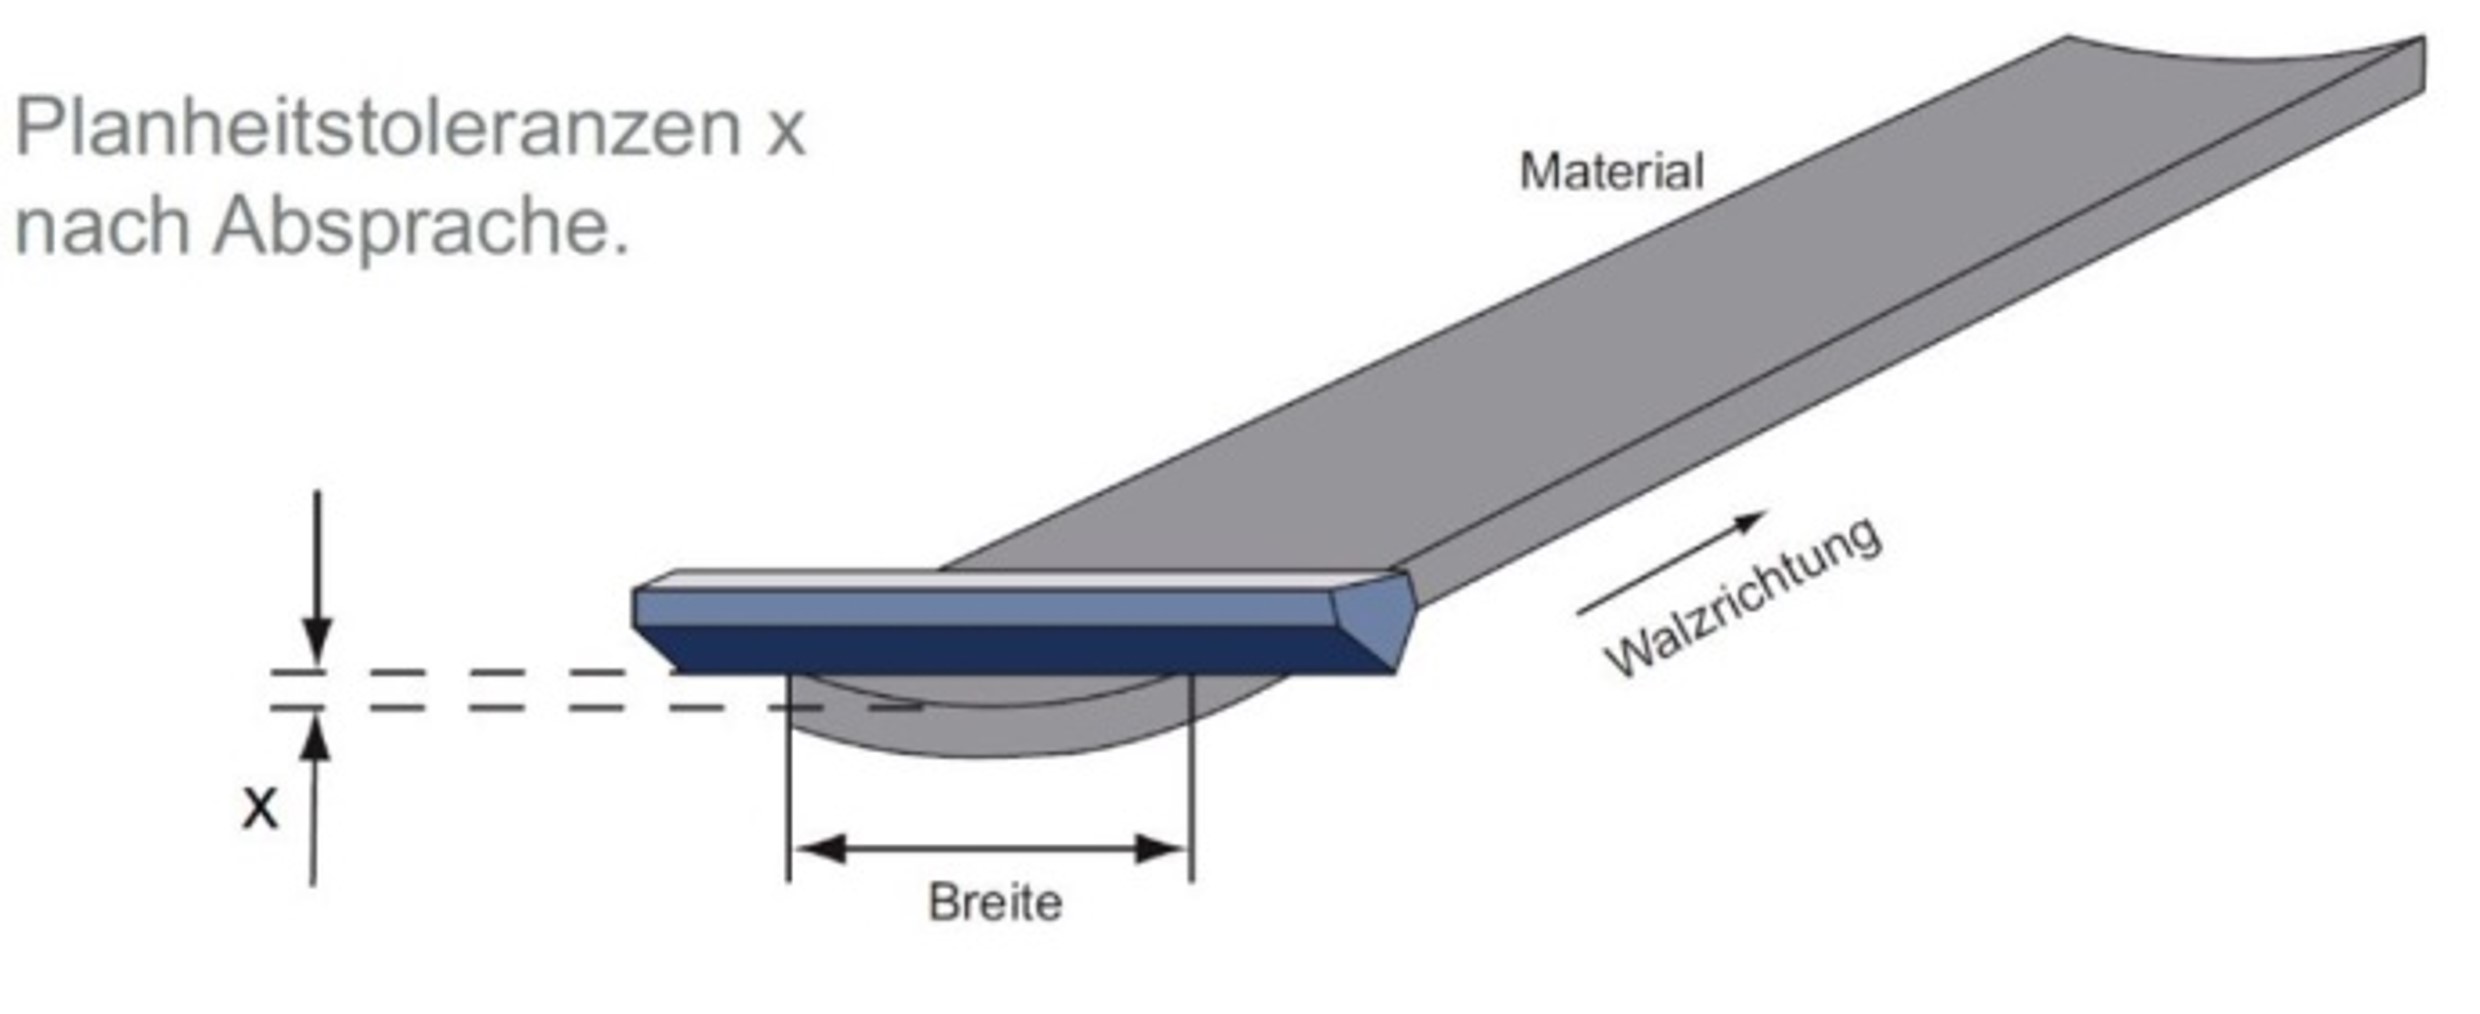
| Flatness | Max. 1.0 µm/mm width for martensitic tempered spring steels with C-contents of 0.67 - 1.00 %, Max. 1.5 - 2.0 µm/mm width for boron-alloyed grades and tempering steels. |
||
| Delivery forms | Coils and cut to lengths | ||
| Cut to length dimensions (2) | Width 80 - 720 mm | Length: 400 - 4000 mm | |
| Specialities | Hardening of low carbon steel with very good flatness values. Hardening of extreme cross-sections with especially wide and thick dimensions. Hardening in lead free process upon agreement. |
||
| (1) Variations depending on grade and dimension to be taken into account (2) Further dimensions upon agreement (3) Strip width < 35 mm only available in slit-after-hardening condition in strip thickness ≤ 0.80 mm |
|||
Spring steels acc. to DIN EN 10132
| Standard | DIN EN 10132 |
| Grades | C55S - C100S, 51CrV4, 58CrV4, 75Cr1, 68CrNiMo33, 75Ni8, 80CrV2, 102Cr6 and similar |
| Chemical cast analysis | Based on DIN EN 10132 and special analysis |
| Strip thicknesses [mm] | 0.20 - 5.20 |
| Strip widths [mm] | 4 - 810 (2) |
| Delivery conditions | LC; A; AC; CR; QT |
| Mechanical properties: | Standard values for Rm, Re, A80; Hardness acc. to DIN EN 10132 Special agreements for particular working- and forming properties after consultation. |
| Surfaces (appearance + finish) | MA with finish RR, RM, RL acc. to DIN EN 10139 MB(1) with finish RL, RM acc. to DIN EN 10139 |
| Dimensional tolerances | Acc. to DIN EN 10140 and special agreement |
| Delivery forms | Coils and cut to lengths |
| Specialities | Best formability, very good fine blanking properties attainable through selective production processes. |
| (1) MB for thicknesses 0.2 - 2.0 mm, thicker dimensions on request (2) Maximum width only for NK | |
Micro-alloyed cold rolled steel strip acc. to DIN EN 10268
| Standard | DIN EN 10268 | |||||||
| Grades | HC260LA | HC300LA | HC340LA | HC380LA | HC420LA | HC460LA | HC500LA | |
| Chemical cast analysis | C (max) | 0.100 | 0,120 | 0,120 | 0,120 | 0,140 | 0,140 | 0,140 |
| Si (max) | 0.500 | 0,500 | 0,500 | 0,500 | 0,500 | 0,600 | 0,600 | |
| Mn (max) | 1,000 | 1,400 | 1,500 | 1,600 | 1,600 | 1,800 | 1,800 | |
| P (max) | 0,030 | 0,030 | 0,030 | 0,030 | 0,030 | 0,030 | 0,030 | |
| S (max) | 0,025 | 0,025 | 0,025 | 0,025 | 0,025 | 0,025 | 0,025 | |
| Al (min) | 0,015 | 0,015 | 0,015 | 0,015 | 0,015 | 0,015 | 0,015 | |
| Ti (max) | 0,150 | 0,150 | 0,150 | 0,150 | 0,150 | 0,150 | 0,150 | |
| Nb (max) | 0,090 | 0,090 | 0,090 | 0,090 | 0,090 | 0,090 | 0,090 | |
| Strip thicknesses [mm] | 0.20 - 5.20 | |||||||
| Strip widths [mm] | 4 - 810(2) | |||||||
| Mechanical properties in LC | ||||||||
| Tensile strength Rm [MPa] | Longitudinal testing |
340 - 420 | 370 - 470 | 400 - 500 | 430 - 550 | 460 - 580 | 480 - 630 | 520 - 690 |
| Yield strength Rp0,2 [MPa] | 240 - 310 | 280 - 360 | 320 - 410 | 350 - 450 | 390 - 500 | 420 - 560 | 460 - 600 | |
| Elongation A80 [%] | min. 27 | min. 24 | min. 22 | min. 20 | min. 18 | min. 14 | min. 13 | |
| Surfaces (appearance + finish) |
MA with finish RR, RM, RL acc. to DIN EN 10139 | |||||||
| MB(1) with finish RL, RM acc. to DIN EN 10139 | ||||||||
| Dimensional tolerances | Acc. to DIN EN 10140 and special agreement | |||||||
| Delivery forms | Coils and cut to lengths | |||||||
| Specialities | Tolerance range for mechanical properties can be reduced further if necessary. Measuring on longitudinal test specimen preferred, transverse testing by agreement. |
|||||||
| (1) MB for thicknesses 0.2 - 2.0 mm, thicker dimensions on request (2) Maximum width only for NK | ||||||||
High strength micro alloyed cold rolled steel strip acc. to DIN EN 10268 (based on)
| Standard | Based on DIN EN 10268 | |||||||
| Grades | Possible grades: RiWi 600 - RiWi 1400 | |||||||
| Chemical cast analysis | Based on DIN EN 10268 with modifications | |||||||
| Strip thicknesses [mm] | 0.80 - 5.50(1) | |||||||
| Strip widths [mm] | 4 - 810(2) | |||||||
| Grades | RiWi 600 | RiWi 700 | RiWi 800 | RiWi 900 | RiWi 1000 | RiWi 1100 | RiWi 1400 | |
| Mechanical properties: | Longitudinal testing |
|||||||
| Tensile strength Rm [MPa] | 630 - 780 | 730 - 880 | 830 - 980 | 920 - 1070 | 1020 - 1170 | 1110 - 1260 | 1410 - 1560 | |
| Yield strength Rp0.2 [MPa] | 600 - 720 | 700 - 820 | 800 - 920 | 900 - 1020 | 1000 - 1150 | 1100 - 1250 | 1400 - 1550 | |
| Elongation A80 [%](4) | min. 10 | min. 10 | min. 9 | min. 7 | min. 5 | min. 3 | ||
| Surfaces (appearance + finish) |
MA, MB(3) with finish RL; (RM) acc. to DIN EN 10139 | |||||||
| Dimensional tolerances | Acc. to DIN EN 10140 and special agreement | |||||||
| Delivery forms | Coils and cut to lengths | |||||||
| Specialities | Intermediary grades on request, measuring on longitudinal test specimen preferred. | |||||||
| (1) Other thicknesses on request (2) Maximum width only for NK (3) MB for thicknesses 0.2 - 2.0 mm, thicker dimensions on request (4) Elongation on request |
||||||||
Tempering steels, boron-alloyed steels acc. to DIN EN 10132
| Standard | DIN EN 10132 |
| Grades | Tempering steels: C40E, C45E, C50E, C55E, C60E, 25Mn4, 25CrMo4, 34CrMo4, 42CrMo4, 50CrMo4 and similar Boron-alloyed steels: 20MnB5, 27MnCrB5-2 and similar; 30MnB5 |
| Chemical cast analysis | Based on DIN EN 10132 and special analysis |
| Strip thicknesses [mm] | 0.20 - 5.20 |
| Strip widths [mm] | 4 - 810 (2) |
| Delivery conditions | LC; A; AC; CR; QT |
| Mechanical properties: | Tempering steels: Standard values for Rm, Re, A80; Hardness acc. to DIN EN 10132, Special agreements for particular working- and forming properties after consultation. Boron-alloyed steels: Mechanical properties upon agreement |
| Surfaces (appearance + finish) | MA with finish RR, RM, RL acc. to DIN EN 10139 MB(1) with finish RL, RM acc. to DIN EN 10139 |
| Dimensional tolerances | Acc. to DIN EN 10140 and special agreement |
| Delivery forms | Coils and cut to lengths |
| Specialities | Also available in special deep drawing condition. |
| (1) MB for thicknesses 0.2 - 2.0 mm, thicker dimensions on request (2) Maximum width only for NK | |
Classic cold rolled strip & special deep drawing grades acc. to DIN EN 10139
| Standard | DIN EN 10139 | ||||||
| Grades(1) | DC 01 | DC 03 | DC 04 | DC 05 | DC 06 | DC 07 | |
| Chemical cast analysis | C (max) | 0.120 | 0.100 | 0.080 | 0.060 | 0.020 | 0.010 |
| Mn (max) | 0.600 | 0.450 | 0.400 | 0.350 | 0.250 | 0.200 | |
| P (max) | 0.045 | 0.035 | 0.030 | 0.025 | 0.020 | 0.020 | |
| S (max) | 0.045 | 0.035 | 0.030 | 0.025 | 0.020 | 0.020 | |
| Ti (max) | 0.300 | 0.200 | |||||
| Strip thicknesses [mm] Delivery conditions |
A, LC - C290 | 0.20 - 5.20 | 0.20 - 2.00 | ||||
| C340 | 0.20 - 5.00 | ||||||
| C390 - C440 | 0.20 - 5.80 | ||||||
| C490 | 0.20 - 5.40 | ||||||
| C590 | 0.20 - 4.00 | ||||||
| C690 | 0.20 - 2.80 | ||||||
| Strip widths (mm) Delivery conditions |
LC - C340 | 4 - 810(2) | |||||
| C390 - C690 | 4 - 810(2) | ||||||
| Mechanical properties | Acc. to DIN EN 10139 | ||||||
| Surfaces (appearance + finish) | MA with finish RR, RM, RL | ||||||
| MB(3) with finish RL, RM | |||||||
| Dimensional tolerances | Acc. to DIN EN 10140 and special agreement | ||||||
| Delivery forms | Coils and cut to lengths | ||||||
| Specialities | With little earing on request | ||||||
| (1) Special analysis on request (2) Maximum width only for NK (3) MB for thicknesses 0.2 - 2.0 mm, thicker dimensions on request | |||||||
Soft magnetic steels acc. to DIN EN 17405 (based on)
| Standard | Based on DIN EN 17405 | |||||
| Grades | RFe 40 | RFe 60 | RFe 80 | RFe 100 | RFe 120 | |
| Chemical cast analysis | C | max. 0.050 | ||||
| Si | max. 0.100 | |||||
| Mn | max. 0.350 | |||||
| P | max. 0.030 | |||||
| S | max. 0.035 | |||||
| Al | max. 0.100 | |||||
| Strip thicknesses [mm] | 0.30 - 4.70 | |||||
| Strip widths [mm] | 4 - 620 (2) | |||||
| Delivery conditions | CR | |||||
| Magnetic properties: Coercive field strenght HC [A/m] |
max. 40 | max. 60 | max. 80 | max. 100 | max. 120 | |
| Surfaces (appearance + finish) | MA with finish RR, RM, RL acc. to DIN EN 10139 MB(1) with finish RL, RM acc. to DIN EN 10139 |
|||||
| Dimensional tolerances | Acc. to DIN EN 10140 and special agreement | |||||
| Delivery forms | Coils and cut to lengths | |||||
| Specialities | No minimum Al-content demanded RFe 20 available on special agreement |
|||||
| (1) MB for thicknesses 0.3 - 2.0 mm, thicker dimensions on request (2) Maximum width only for NK | ||||||
Case hardening steels acc. to DIN EN 10132
| Standard | DIN EN 10132 and special analysis | ||||
| Grades | C10E | C15E | 16MnCr5 | 17Cr3 | |
| Chemical cast analysis | C | 0.070 - 0.130 | 0.120 - 0.180 | 0.140 - 0.190 | 0.140- 0.200 |
| Si | max. 0.400 | max. 0.400 | max. 0.400 | max. 0.400 | |
| Mn | 0.300 - 0.600 | 0.300 - 0.600 | 1.000 - 1.300 | 0.600 - 0.900 | |
| P | max. 0.025 | max. 0.025 | max. 0.025 | max. 0.025 | |
| S | max. 0.035 | max. 0.035 | max. 0.035 | max. 0.035 | |
| Cr | max. 0.400 | max. 0.400 | 0.800 - 1.100 | 0.700 - 1.250 | |
| Mo | max. 0.100 | max. 0.100 | |||
| Ni | max. 0.400 | max. 0.400 | |||
| Cu | max. 0.300 | max. 0.300 | max. 0.400 | max. 0.400 | |
| Strip thicknesses [mm] | Delivery condition LC, (A): 0.20 - 5.20; Delivery condition CR: 0.20 - 5.50 | ||||
| Strip widths [mm] | 4 - 810(2) | ||||
| Delivery conditions | LC; A; AC; CR | ||||
| Mechanical properties for delivery condition LC and longitudinal testing: |
|||||
| Tensile strength Rm [MPa] | max. 430 | max. 450 | max. 550 | max. 550 | |
| Yield strength Rp0,2 [MPa] | max. 345 | max. 360 | max. 420 | max. 420 | |
| Elongation A80 [%] | min. 26 | min. 25 | min. 21 | min. 21 | |
| Hardness [HV] | max. 135 | max. 140 | max. 170 | max. 170 | |
| Surfaces (appearance + finish) | MA with finish RR, RM, RL acc. to DIN EN 10139 | ||||
| MB(1) with finish RL, RM acc. to DIN EN 10139 | |||||
| Dimensional tolerances | Acc. to DIN EN 10140 and special agreement | ||||
| Delivery forms | Coils and cut to lengths | ||||
| (1) MB for thicknesses 0.2 - 2.0 mm, thicker dimensions on request (2) Maximum width only for NK | |||||
Key steels acc. to DIN EN ISO 683-4 (based on)
| Standard | Based on DIN EN ISO 683-4 | ||
| Grades | 11SMn30, AMn / Ancora W I | ||
| Chemical cast analysis | C | max. 0.15 | |
| Si | max. 0.05 | ||
| Mn | 0.90 - 1.30 | ||
| P | max. 0.11 | ||
| S | 0.22 - 0.33 | ||
| Strip thicknesses [mm] | 0.50 - 5.00 | ||
| Strip widths [mm] | 4 - 420 | ||
| Delivery conditions | LC; CR | ||
| Mechanical properties: | Typically with tensile strengths around 600 Mpa; Further characteristics and tolerances feasible by agreement. |
||
| Surfaces (appearance + finish) | MA with finish RR, RM, RL acc. to DIN EN 10139 | ||
| Dimensional tolerances | Acc. to DIN EN 10140 and special agreement | ||
| Delivery forms | Coils and cut to lengths | ||
| Specialities | These steels are characterised by very good milling and stamping properties, with short chip-formation and high torsional strength. | ||
Construction steels acc. to DIN 1623
| Standard | DIN 1623 | |||
| Grades | S215G | S245G | S325G | |
| Chemical cast analysis | C | max. 0.180 | max. 0.200 | max. 0.200 |
| Si | - | - | max. 0.550 | |
| Mn | max. 1.500 | max. 1.600 | max. 1.600 | |
| P | max. 0.030 | max. 0.030 | max. 0.030 | |
| S | max. 0.025 | max. 0.025 | max. 0.025 | |
| Strip thicknesses [mm] | 0.20 - 5.20 | |||
| Strip widths [mm] | 4 - 810 (2) | |||
| Delivery conditions | LC; CR | |||
| Mechanical properties for delivery condition LC and transverse testing (3): Tensile strength Rm [MPa] Yield strength Rp0,2 [MPa] Elongation A80 [%] |
360 - 510 |
430 - 580 |
510 - 680 |
|
| Surfaces (appearance + finish) | MA with finish RR, RM, RL acc. to DIN EN 10139 MB(1) with finish RL, RM acc. to DIN EN 10139 |
|||
| Dimensional tolerances | Acc. to DIN EN 10140 and special agreement | |||
| Delivery forms | Coils and cut to lengths | |||
| Specialities | Roll hardened condition (CR) available on request | |||
| (1) MB for thicknesses 0.5 - 2.0 mm, thicker dimensions on request (2) Maximum width only for NK (3) Longitudinal testing by agreement |
||||
Tolerances and conditions
Edges acc. to DIN EN 10140
| Edge conditions | Sketch |
| Both edges machine-rounded | |
| Both edges right-angled | |
| Strip upper or lower side chamfered with defined angles of 5° to 90° | |
| Both strip sides chamfered with different angles of 5° to 90° | |
| One edge machine-rounded | |
| One edge with chamfered upper and lower strip side with defined angles of 5° to 90° | |
| One edge chamfered with defined angle of 5° to 90° and other edge right-angled |
Strip thickness tolerances acc. to DIN EN 10140
| Strip thickness tolerances acc. to DIN EN 10140 and special tolerances | |||
| Nominal widths [mm] | < 125 | ≥ 125 up to ≤ 650 | > 650 up to ≤ 800 |
| Nominal thicknesses [mm] | A B C | A B C | A B C |
| +/- + /- +/- | +/- + /- +/- | +/- + /- +/- | |
| > 0,15 ≤ 0,25 EN | 0.015 0.012 0.008 | 0.020 0.015 0.010 | 0.025 0.015 0.012 |
| * RWST | 0.008 | 0.010 | 0.010 |
| > 0,25 ≤ 0,40 EN | 0.020 0.015 0.010 | 0.025 0.020 0.012 | 0.030 0.020 0.015 |
| RWST | 0.010 | 0.012 | 0.013 |
| > 0,40 ≤ 0,60 EN | 0.025 0.020 0.012 | 0.030 0.025 0.015 | 0.035 0.025 0.020 |
| RWST | 0.012 | 0.013 | 0.014 |
| > 0,60 ≤ 1,00 EN | 0.030 0.025 0.015 | 0.035 0.030 0.020 | 0.040 0.030 0.025 |
| RWST | 0.014 | 0.014 | 0.015 |
| > 1,00 ≤ 1,50 EN | 0.035 0.030 0.020 | 0.040 0.035 0.025 | 0.050 0.045 0.030 |
| RWST | 0.018 | 0.018 | 0.018 |
| > 1,50 ≤ 2,50 EN | 0.045 0.035 0.025 | 0.050 0.040 0.030 | 0.060 0.045 0.035 |
| RWST | 0.020 | 0.020 | 0.020 |
| > 2,50 ≤ 4,00 EN | 0.050 0.040 0.030 | 0.060 0.050 0.035 | 0.075 0.055 0.040 |
| RWST | 0.025 | 0.025 | 0.030 |
| > 4,00 ≤ 6,00 EN | 0.060 0.050 0.035 | 0.070 0.055 0.040 | 0.090 0.065 0.045 |
| RWST | 0.035 | 0.035 | 0.040 |
| > 6,00 ≤ 8,00 EN | 0.075 0.060 0.040 | 0.085 0.065 0.045 | 0.100 0.075 0.050 |
| * RWST = Risse + Wilke special tolerance | |||
| Minimum distance of the measuring points from the edge for strip thicknesses acc. to DIN EN 10140 | ||
| Type of edge | Nominal widths W [mm] | Minimum distances of measuring |
| points from the edge [mm] * | ||
| As rolled edges (NK) | W ≤ 30 | 0.5 W |
| 30 < W < 800 | 15 | |
| GK - slit edges | W ≤ 20 | 0.5 W |
| 30 < W ≤ 800 | 10 | |
| SK - special edges | Upon consultation | |
| * Other measuring point distances possible by special agreement | ||
Strip widths tolerances acc. to DIN EN 10140
| Strip widths tolerances (DIN EN 10140) | ||
| Widths tolerances for products with as-rolled edges | ||
| Nominal widths [mm] | Widths tolerances [mm] | |
| < 40 | 0/+ 1.6 | |
| ≥ 40 < 80 | 0/+ 2.0 | |
| ≥ 80 < 125 | 0/+ 2.4 | |
| ≥ 125 < 250 | 0/+ 3.0 | |
| ≥ 250 < 400 | 0/+ 3.6 | |
| ≥ 400 < 500 | 0/+ 4.2 | |
| ≥ 500 < 600 | 0/+ 4.5 | |
| ≥ 600 < 800 | 0/+ 5.0 not standardised | |
| Widths tolerances for products with slit edges | |||||||||
| Widths tolerances | Standardised production width [mm] | Not standardised [mm] | |||||||
| EN 10140 | |||||||||
| Nominal thicknesses [mm] | < 125 | ≥ 125 - < 250 | ≥ 250 - < 600 | ≥ 600 - < 800 | |||||
| A | B | A | B | A | B | A | B | ||
| +/- | +/- | +/- | +/- | +/- | +/- | +/- | +/- | ||
| > 0.20 ≤ 0.60 EN | 0.15 | 0.10 | 0.15 | 0.10 | 0.25 | 0.18 | 0.30 | 0.22 | |
| *RWST (Range) | 0.10 | 0.10 | 0.15 | 0.20 | |||||
| > 0.60 ≤ 1.50 EN | 0.20 | 0.13 | 0.20 | 0.13 | 0.30 | 0.20 | 0.35 | 0.24 | |
| *RWST (Range) | 0.15 | 0.15 | 0.25 | 0.30 | |||||
| > 1.50 ≤ 2.50 EN | 0.25 | 0.18 | 0.25 | 0.18 | 0.35 | 0.25 | 0.40 | 0.30 | |
| *RWST (Range) | 0.20 | 0.20 | 0.35 | 0.40 | |||||
| > 2.50 ≤ 4.00 EN | 0.30 | 0.20 | 0.30 | 0.20 | 0.40 | 0.30 | 0.45 | 0.35 | |
| *RWST (Range) | 0.25 | 0.25 | 0.45 | 0.50 | |||||
| > 4.00 ≤ 6.00 EN | 0.35 | 0.25 | 0.35 | 0.25 | 0.45 | 0.35 | 0.50 | 0.40 | |
| *RWST (Range) | 0.30 | 0.30 | 0.50 | 0.60 | |||||
| > 6.00 ≤ 7.00 EN | 0.45 | 0.45 | 0.45 | 0.45 | 0.55 | 0.55 | 0.55 | 0.55 | |
| *RWST (Range) | |||||||||
| * RWST = Risse + Wilke special tolerance | |||||||||
Tolerances on shape acc. to DIN EN 10140
- T
 olerances on shape
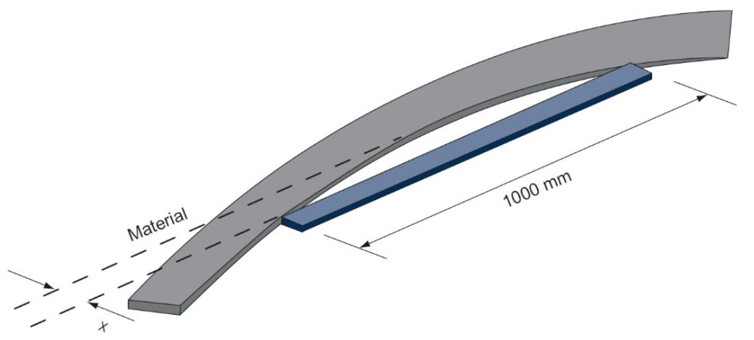
| Edge camber (DIN EN 10140) | |||
| Nominal width W [mm] | Tolerances on edge camber x for a length of 1.000 mm | ||
| Class A [mm] | Class B [mm] | ||
| 10 < W < 25 | 5.00 | 2.00 | |
| 25 < W < 40 | 3.50 | 1.50 | |
| 40 < W < 125 | 2.50 | 1.25 | |
| 125 < W < 800 | 2.00 | 1.00 | |
| Tolerances for the edge camber are only applicable to cold rolled strip with a width of at least 10 times the thickness. | |||
 |
|||
| Flatness of cut length (DIN EN 10140) | Flatness/ Transversal Flatness |
 |
 |
Strip length tolerances / surfaces / delivery conditions acc. to DIN EN 10140
| Length tolerances (DIN EN 10140) | ||
| Length tolerances for cold rolled strip in cut to length | ||
| Nominal length L [mm] | Length tolerances [mm] | |
| Class A | Class B | |
| L < 1.000 | + 10 | + 6 |
| 1.000 < L < 2.500 | + 0.01 L | + 6 |
| L > 2.500 | + 0.01 L | + 0.003 L |
| Surface appearance and finish (DIN EN 10139) | ||
| Surface appearance | Surface finish [µm] | |
| MA (RL, RM, RR) | RL: Ra < 0.6 | |
| MB (RL, RM) | RM: 0.6 < Ra < 1.8 | |
| RR: Ra > 1.5 | ||
| Delivery condition | ||
| LC | Annealed, skin passed | |
| A | Annealed | |
| AC | Spheroidised annealed carbides | |
| CR | Cold rolled | |
| C290-C690 | Work hardened | |
| QT | Martensitic quenched and tempered |
